- SAP ABAP
- What is SAP ABAP
- SAP ABAP Data Dictionary and Domain
- SAP ABAP Data Element
- SAP ABAP Database Table
- SAP ABAP Database tables and views
- SAP ABAP Foreign Key
- SAP ABAP Indexes
- SAP ABAP Structure
- SAP ABAP Package
- SAP ABAP Adding Fields to SAP Standard Table
- SAP ABAP Internal Table and Database Table
- SAP ABAP Select Option and Parameter
- SAP ABAP Types of Internal Table
- SAP ABAP ways of Declaring Internal Tables
- SAP ABAP Mastering Initialization Technique
- SAP ABAP Operations on Internal Table
- SAP ABAP Record Retrieval
- SAP ABAP Insert, Modify and Delete data in the Internal table by using Keywords
- SAP ABAP Sorting and Removing Adjacent Duplicates
- SAP ABAP Seamless Data Transfer Between Internal Tables
- SAP ABAP Search Help Types
- SAP ABAP Lock Objects and Types
- SAP ABAP Buffering and Its Types
- SAP ABAP TMG
- SAP ABAP Table Types
- SAP ABAP Views
- SAP ABAP Control Break Statement
- SAP ABAP COMMIT and ROLLBACK
- SAP ABAP Joins
- SAP For All Entries
- SAP ABAP Procedure to Fill Final Internal Table
- SAP ABAP Modularization
- SAP ABAP Function Group and Function Module
- SAP ABAP SELECT Options
24DDIC1207 – Understanding Database Tables in SAP ABAP
A database table in SAP ABAP is a structured collection of data stored in the SAP database. It is defined in the ABAP Dictionary and is used to store and manage data required by SAP applications.
Creating Database Tables in SAP ABAP
In SAP ABAP, there are two primary methods to create a database table in the ABAP Dictionary:
- Direct Method / Predefined Type
- Data Element Type
Technical Requirements
- Table Naming Convention: The table name must begin with “Y” or “Z” because names starting with “A” to “X” are reserved for SAP.
- Delivery Class: This defines the owner of the table and controls data transfer between tables.
- Technical Settings & Size Category: These parameters specify the storage and memory allocation for the table.
Creating a Database Table Using the Direct Method / Predefined Type
Step-by-Step Guide:
Step 1: Execute SAP Tcode “SE11”
Enter “SE11” in the SAP command field and press Enter.

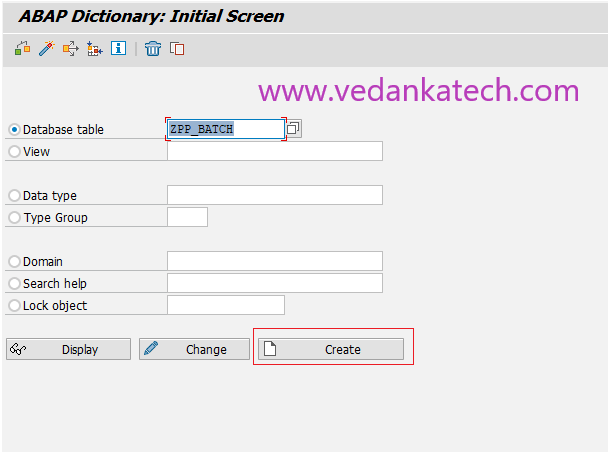
Step 2: ABAP Dictionary: Initial Screen
Select the “Database table” radio button.
Enter the name of the database table (starting with “Y” or “Z”).
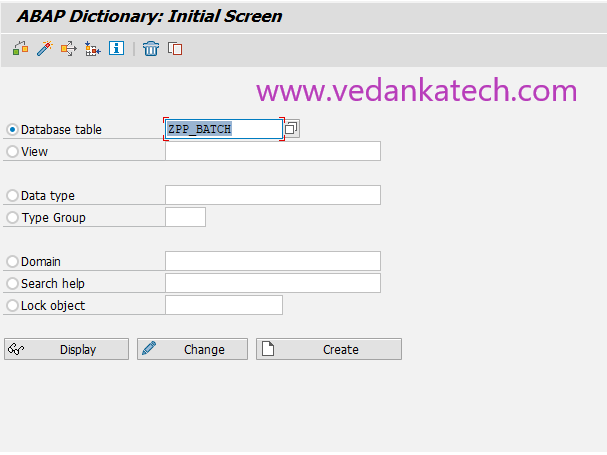
Click on the “Create” button.
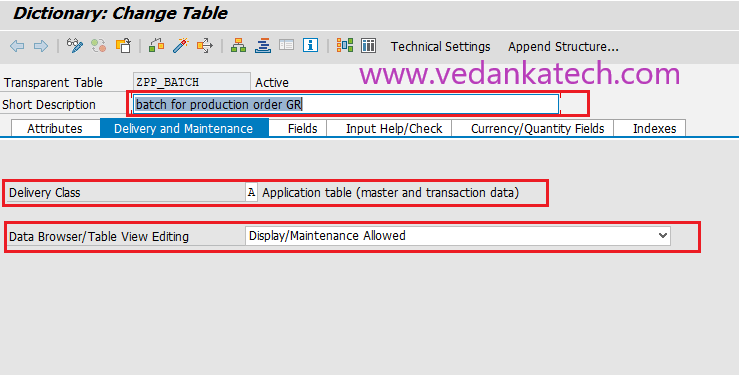
Step 3: Dictionary: Maintain Table
Enter a short description for the table.
Set the Delivery Class to “A” (for application tables).
Set the Data Browser/Table View Maint. to “Display/Maintenance allowed”.
Proceed to the “Fields” tab.
Step 4: Predefined Type
Select the “Predefined type” option.

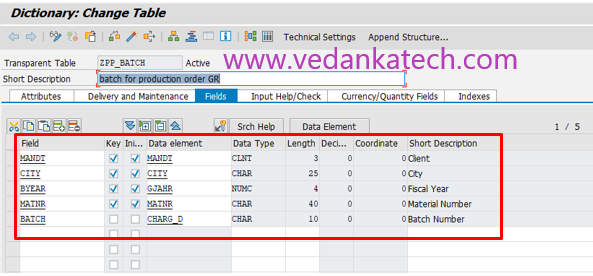
Step 5: Define Table Fields
Enter the field name.
Set the field as a key if required by checking the “Key” option.
Select the data type (e.g., Numeric or Character).
Specify the length of the field.
Save the Table
Click on the save icon to save your table. A “Create Object Directory Entry” window will appear.
Enter the package name or choose “Local Object”.
Activation
To activate the table, navigate to Goto -> Technical Settings or use the shortcut Ctrl+Shift+F9.
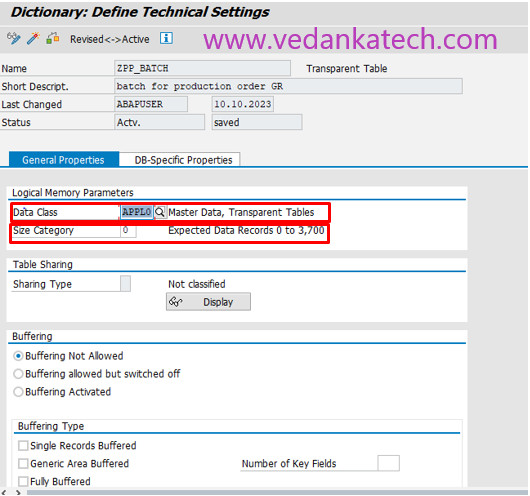
Step 6: Technical Settings
Set the Data Class from the drop-down list.
Specify the Size Category for the table, determining the storage allocation.
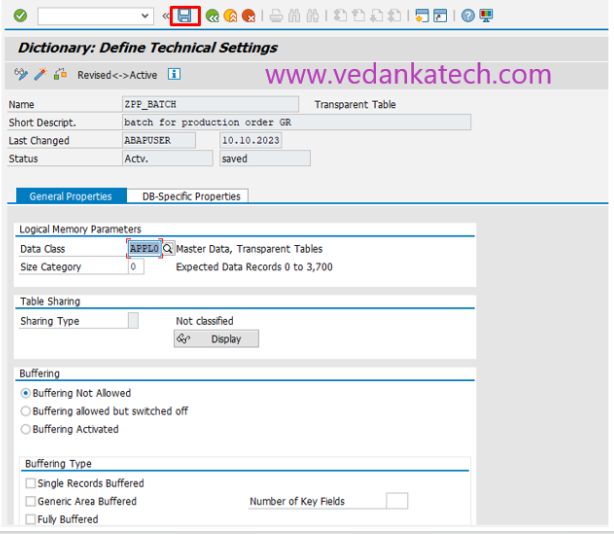
Save the technical settings and activate the table using the Activate icon (Ctrl+F3).
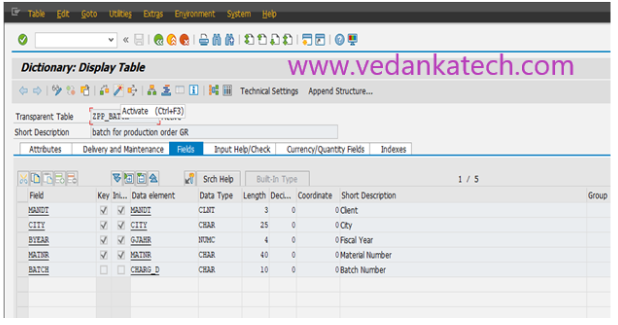
Upon successful activation, your database table is ready for use in SAP ABAP.
Author : Aniket Pawar, 9373518385
24DDIC1207 – Understanding Database Tables in SAP ABAP
A database table in SAP ABAP is a structured collection of data stored in the SAP database. It is defined in the ABAP Dictionary and is used to store and manage data required by SAP applications.
Creating Database Tables in SAP ABAP
In SAP ABAP, there are two primary methods to create a database table in the ABAP Dictionary:
- Direct Method / Predefined Type
- Data Element Type
Technical Requirements
- Table Naming Convention: The table name must begin with “Y” or “Z” because names starting with “A” to “X” are reserved for SAP.
- Delivery Class: This defines the owner of the table and controls data transfer between tables.
- Technical Settings & Size Category: These parameters specify the storage and memory allocation for the table.
Creating a Database Table Using the Direct Method / Predefined Type
Step-by-Step Guide:
Step 1: Execute SAP Tcode “SE11”
Enter “SE11” in the SAP command field and press Enter.

Step 2: ABAP Dictionary: Initial Screen
Select the “Database table” radio button.
Enter the name of the database table (starting with “Y” or “Z”).

Click on the “Create” button.

Step 3: Dictionary: Maintain Table
Enter a short description for the table.
Set the Delivery Class to “A” (for application tables).
Set the Data Browser/Table View Maint. to “Display/Maintenance allowed”.
Proceed to the “Fields” tab.

Step 4: Predefined Type
Select the “Predefined type” option.

Step 5: Define Table Fields
Enter the field name.
Set the field as a key if required by checking the “Key” option.
Select the data type (e.g., Numeric or Character).
Specify the length of the field.

Save the Table
Click on the save icon to save your table. A “Create Object Directory Entry” window will appear.
Enter the package name or choose “Local Object”.
Activation
To activate the table, navigate to Goto -> Technical Settings or use the shortcut Ctrl+Shift+F9.
Step 6: Technical Settings
Set the Data Class from the drop-down list.
Specify the Size Category for the table, determining the storage allocation.
Save the technical settings and activate the table using the Activate icon (Ctrl+F3).


Upon successful activation, your database table is ready for use in SAP ABAP.
Author : Aniket Pawar, 9373518385

